Cloud Terminal Software
Terminal software connects your workstation with a Giant
server that's running in the cloud. Installing this software
takes about 10 minutes and has three sections:
Downloading terminal software
Creating a desktop icon
Saving your security key
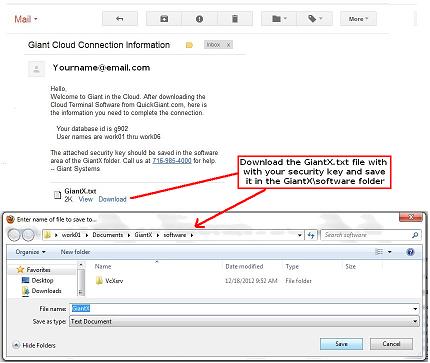
Before starting, you should have an email message listing your database id (something like g918) and user name (something like work01). This message comes with an attachment that contains your private security key.
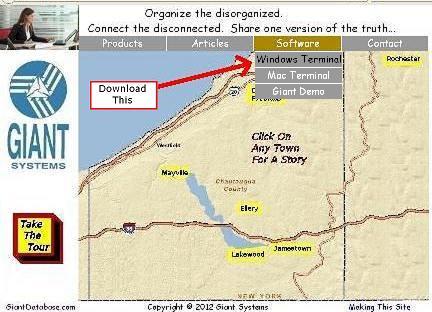
First - Download Windows Terminal Software
To download terminal software, go to the QuickGiant.com website. In the Software section click on Windows Terminal and save the GiantX.zip file to your hard drive.
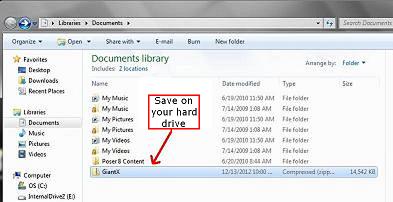
When the download completes, doubleclick on GiantX.zip and choose Extract All Files. As you click thru the extraction process, a folder called GiantX (without the zipper) will be created. After extracting, you can delete the GiantX.zip file because it's no longer needed.


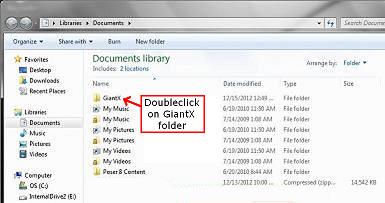
Second - Create Windows Desktop Icon
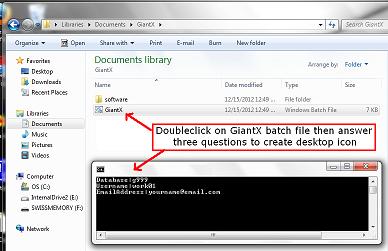
Doubleclick on the new GiantX folder then doubleclick on the GiantX batch file that's inside. Use the keyboard to answer questions about your database id, user name, and email address (email is where printed reports will show up). Close to the desktop and look for a new blue circle Giant icon.
Third - Save Windows Security Key
You're almost done. Find that email with your database id and user name and save the attached GiantX.txt file into the GiantX\software area. Cloud access will not be allowed until you've saved the security key.
Close email and get back to the desktop. Doubleclick the blue circle Giant icon and wait about 30 seconds for a customer database screen to appear. You may have to tell your firewall to allow the programs to run. If you have problems, call Giant support at 716-985-4000. The most common trouble is a security key that's not stored correctly.
Running Windows Cloud Terminal
About 20 seconds after you doubleclick on the desktop icon, a Giant database screen should take over the screen. Wait for the connection to respond as nothing visual happens during the first few seconds. More clicking may result in multiple sessions and "sharing violation" messages.
To close the connection, click on the uppermost "x" in the upper right corner until the Windows desktop appears (the ESC key is even faster but does not close word processing).
If you're running the cloud terminal and want to switch to a Windows application, press Ctrl-ESC. The cloud application now appears on the taskbar and the Windows desktop is visible. To switch back to the cloud, click on Giant Server taskbar icon. The Alt-TAB key switches between taskbar applications and is a nice way to switch between Windows and the cloud.
If you're runing the cloud terminal and looking at a Giant screen, pressing function key F7 will open a Linux Firefox web browser starting at the Google home page. This can be useful to transfer files or copy/paste thru webmail. Pressing Ctrl-Tab will switch between windows in the Linux cloud.
Once in a while the internet connection gets disrupted. When this happens restart the computer or use Task Manager to manually stop the tasks GiantX.exe, nxproxy.exe, vcxsrv.exe, and sshd.exe. The next connection will complain with a "sharing violation" message. Say "OK" to the error to shutdown and the next connection should succeed.
To remove cloud terminal software, use a command prompt and
navigate to the directory containing then GiantX.bat file.
Then type the following command:
GiantX uninstall
This removes cloud software files and registry keys.
Apple Mac Cloud Terminal
Apple Mac computers with Intel processors have been tested and can connect with Giant in the cloud. The Leopard, Snow Leopard, and Lion releases include the required X11 software but Mountain Lion will be prompted to add this from the XQuartz project.
Mac terminal software is available for download at
QuickGiant.com. After it's downloaded, drag the x2goclient
to the desktop and then you can throw away the download
container. Doubleclick on x2goclient for initial setup. Fill the
Session Name as Giant and Host box with your cloud IP
address, the Login box with one of your usernames (like
WORK02), and change the SSH Port to 8222. Browse for
the SSH Key that you received via email and change the
Session Type to say CustomDesktop with Command like:
gcloud.exe g999 yourname@gmail.com
In the Session Preferences area choose the Settings tab and
we recommend FullScreen and uncheck to turn off Sound
and Client Side Printing. In the Shared Folders tab uncheck
SSH Port Forwarding. Once this is done, click on the words
New Session on the right side to test your connection.
When running full screen the dock will intefere a little with the bottom of the windows and this can be avoided by going into Applications-Utilities-Terminal and in Session Preferences choose Dock=Autohide. You might also decide to drag the x2goclient on the desktop into the dock and then move the desktop icon to Downloads (or some other place) so your desktop is nice and clean.
